

All About Ear Piercings: Types, Pain, Healing & Care
Ear Piercings: A Safe Start to Your Personal Style
Ear piercings range from quick-healing lobe studs to more complex cartilage placements such as helix, conch, daith, rook, and industrial piercings. The safest approach is simple: choose an experienced professional who uses a single-use sterile needle, begin with body-safe jewelry such as implant-grade titanium or solid 14k gold, and follow a low-touch saline aftercare routine.
Lobe piercings are usually the easiest starting point. They tend to hurt less and heal in about 6 to 8 weeks. Cartilage piercings can create a striking ear stack, but they need more patience: many take 6 to 12 months to fully heal.
Today, piercings are not just individual accessories. They are part of a considered look, where placement, metal tone, scale, and jewelry shape work together to reflect personal style. This guide covers the choices that matter before you commit: placement, pain, healing, jewelry, and care.
I’m W.A. Muller, and we’ll begin by mapping the ear so you can understand what each placement really involves.
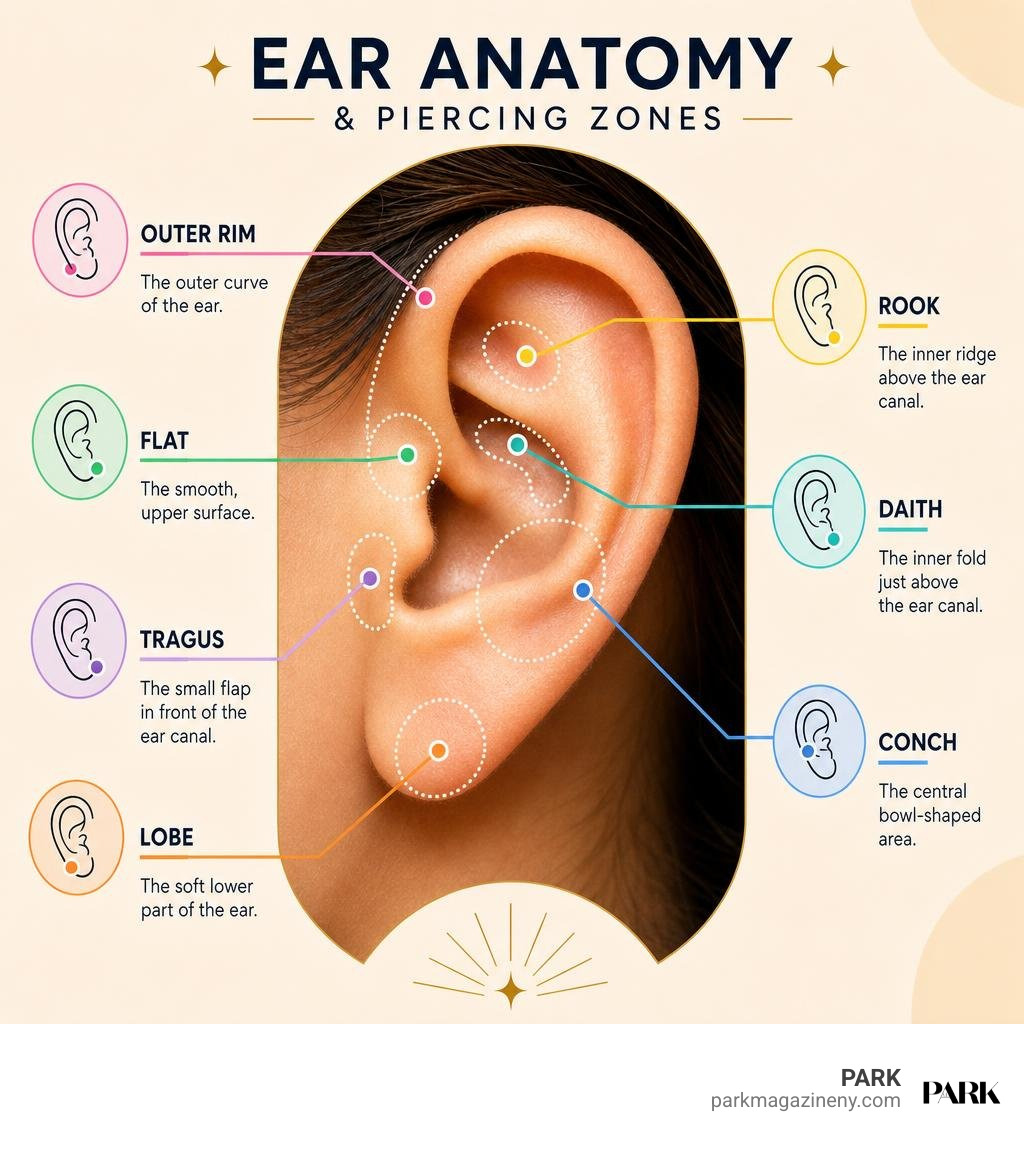
Ear piercings glossary:
Anatomical Guide to Different Ear Piercings by Zone
Understanding the distinct zones of your ear makes planning your styling journey effortless. The human ear features around 15 distinct piercing sites, each interacting uniquely with surrounding tissue, nerve pathways, and blood vessels. Soft tissue like the lobe enjoys rich vascularity, whereas dense cartilage relies on minimal blood supply. This core biological difference dictates how each site recovers. Piercing has a storied heritage spanning thousands of years, evolving from ancient cultural rituals into modern art—a transition explored in historical records on the classic Earring and its enduring social significance.
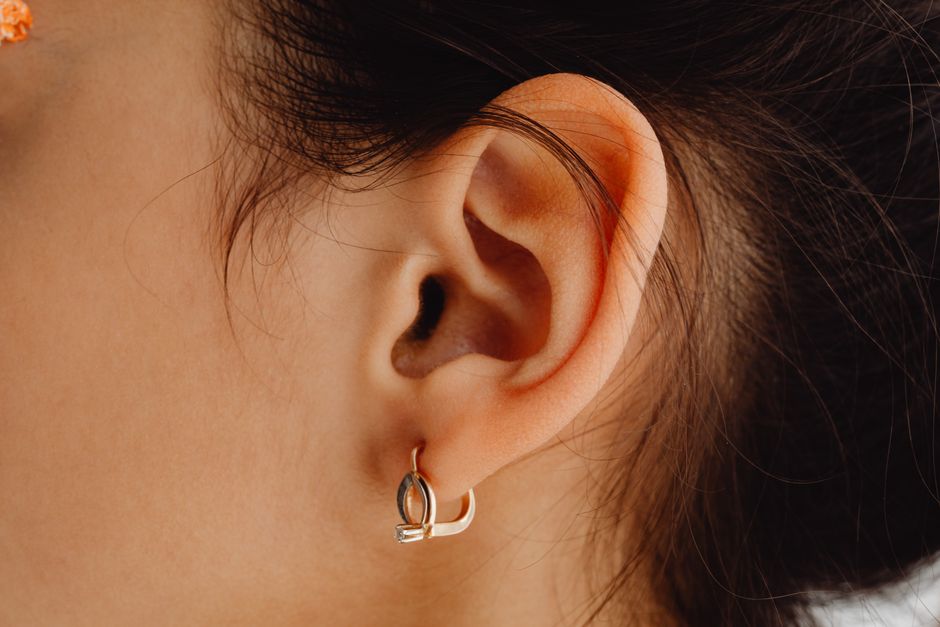
Lobe Placements: Standard, Upper, and Stacked
The fleshy lower portion of your ear serves as the primary canvas for most collections. In the United States, roughly 84% of women and 64% of men have pierced lobes.
- Standard First Lobe: Positioned centrally on the lower soft tissue, this placement remains the world’s most popular piercing. It offers maximum flexibility for heavier statement earrings, huggies, and drops.
- Upper and High Lobe: Placed vertically or horizontally above the first hole. Most individuals have space for two to four lobe piercings per ear. Moving higher toward the transition point where soft flesh meets cartilage requires slightly smaller jewelry scales.
- Stacked Lobe: A contemporary technique where a second hole is placed directly above the standard lobe piercing rather than beside it, creating a striking vertical pair.
- Transverse Lobe: A unique, horizontal channel that passes through the lobe from the outer edge to the inner fold, using a barbell.
- Constellation Placements: An artistic arrangement of tiny studs scattered organically across the lower ear lobe area.
Initial lobe piercings are typically pierced at 18G to 20G thickness, settling comfortably into soft tissue without placing undue tension on delicate skin.
Outer Rim Placements: Helix, Forward Helix, and Industrial
The outer curved rim of cartilage provides the structural perimeter for your ear design:
- Standard Helix: Perforating the upper outer cartilage rim, the helix is the most popular upper-ear choice. It can be worn as a single stud, multiple stacked accents, or eventually a snug ring.
- Forward Helix: Positioned on the cartilage edge directly above the tragus, facing frontward toward the face. Often arranged in curated sets of two or three descending studs.
- Hidden Helix (Peekaboo Piercing): Tucked under the deep top rim fold of the ear. The jewelry post remains hidden, allowing a dainty charm or gemstone to drape subtly beneath the cartilage fold.
- Flat Placement: Located on the smooth, broad expanse of cartilage between the outer helix rim and the elevated inner ear ridge. This flat surface is ideal for showcasing elaborate decorative studs or gemstone clusters.
- Industrial Piercing: A bold placement consisting of two separate cartilage perforations—one through the forward helix and one through the rear upper helix—connected by a single, continuous straight barbell. Because both channels share a rigid bar, they stay under shared tension, requiring precise anatomical alignment.
Inner Cartilage Placements: Tragus, Conch, Rook, Daith, and Snug
Inner cartilage features thicker tissue contours that demand high technical skill:
- Tragus: The small, thick flap of cartilage situated directly in front of the ear canal opening. It pairs beautifully with minimalist flat-back labret studs.
- Anti-Tragus: The raised ridge of cartilage directly opposite the tragus, sitting just above the earlobe.
- Conch: Located in the central hollow cup of the ear. A conch piercing can be styled with an internal flat-back stud or wrapped with a large-diameter ring once fully healed.
- Daith: Perforating the innermost cartilage fold right above the ear canal entrance. A daith is one of the few piercings traditionally started with a curved hoop or clicker ring rather than a straight post.
- Rook: Located vertically through the elevated cartilage ridge in the upper inner ear, positioned just above the daith.
- Snug (Anti-Helix): Passing horizontally through the dense ridge of cartilage between the inner conch and outer helix rim.
- Orbital: A single ring that passes through two separate piercing holes placed close together within the same cartilage ridge.
Because inner ear folds vary drastically from person to person, a professional piercer must evaluate your individual ear structure to confirm adequate tissue depth and safe angles before proceeding.
Pain Scale, Needles vs. Guns, and Healing Timelines
Every piercing creates a controlled puncture wound. Knowing what to expect regarding nerve sensations, sterile instruments, and biological healing phases helps prevent unwanted complications. Reputable medical resources like Ear Piercings: What to Know emphasize that tissue type, proper needle selection, and strict hygiene form the foundation of a safe piercing experience.
Most Painful vs Least Painful Ear Piercings
Pain is inherently personal, but nerve density and cartilage thickness create clear patterns across different ear locations.
Soft earlobe tissue contains fewer nerve receptors, registering as a minor pinch followed by warm, dull throbbing (rated 2 to 4 out of 10). Outer cartilage areas like the standard helix and conch yield a moderate pressure sensation (rated 5 out of 10).
Dense inner cartilage folds such as the tragus, daith, and rook demand greater push resistance, registering higher on the discomfort scale (6 to 7 out of 10). Meanwhile, snug piercings (rated 7 to 8 out of 10) and industrial piercings (rated 7 to 8 out of 10) are widely considered the most painful due to thick cartilage folds and the need for dual simultaneous punctures.
Professional Hollow Needle vs. Piercing Gun Safety
The instrument used to pierce your ear directly impacts your tissue’s recovery:
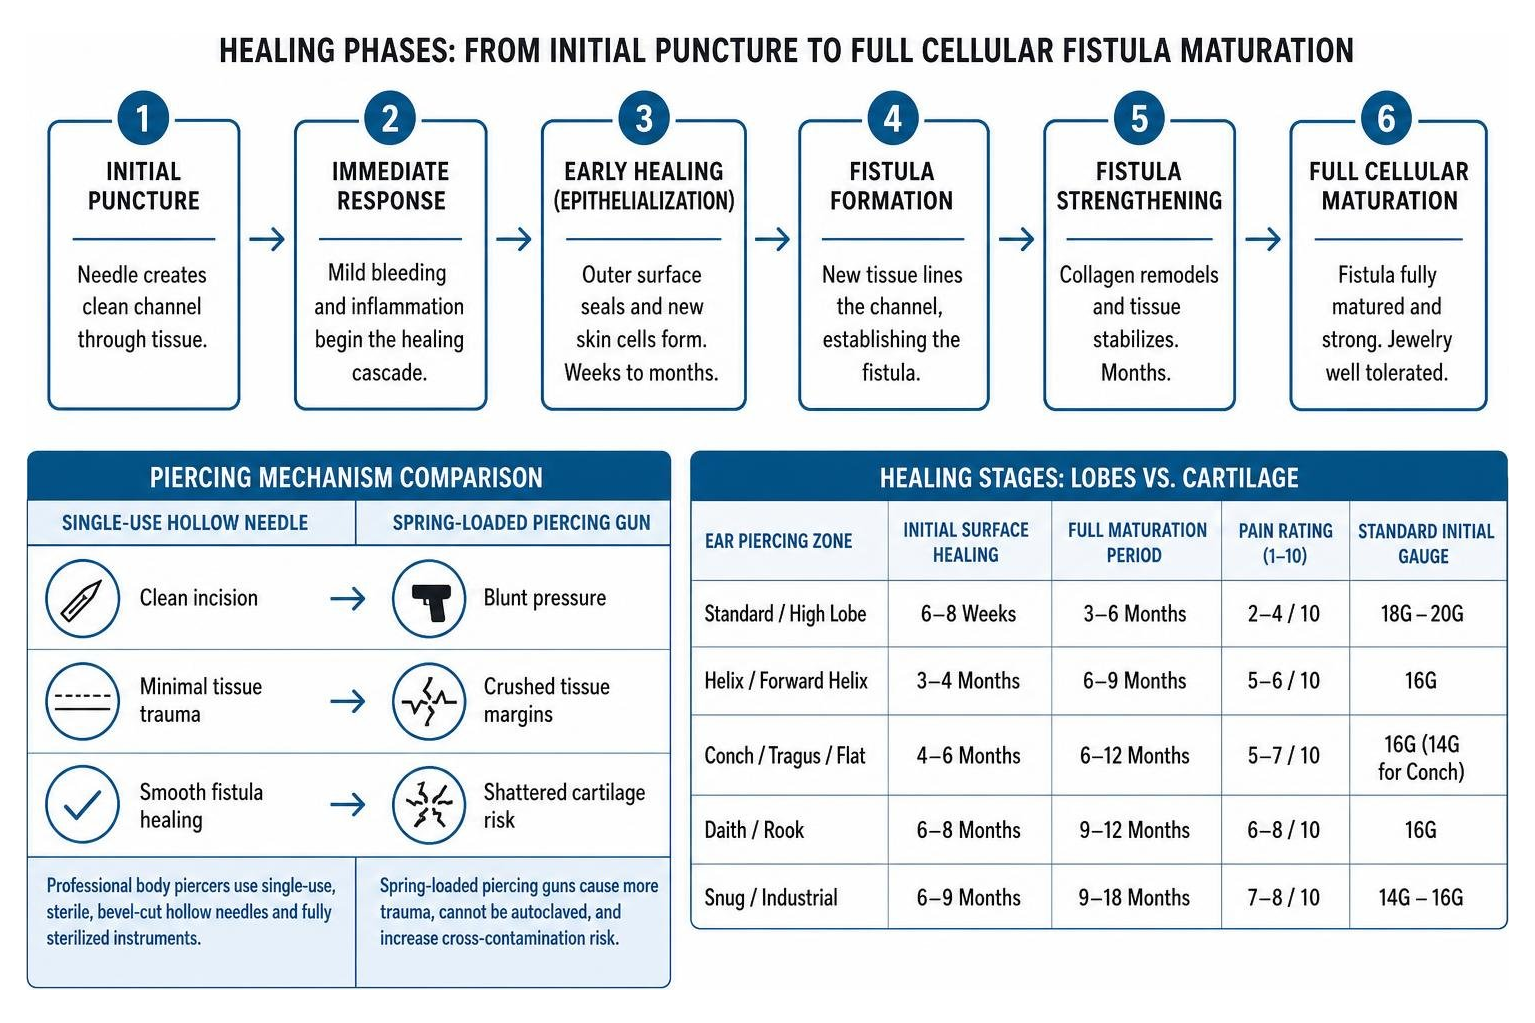
Professional body piercers rely exclusively on single-use, sterile, bevel-cut hollow needles. A precision-ground needle cleanly separates tissue, creating an open channel (fistula) that readily accommodates the jewelry post without compressing surrounding tissue. Furthermore, medical needles, stainless forceps, and titanium posts undergo complete sterilization inside a pressurized autoclave.
In contrast, spring-loaded plastic piercing guns force a blunt, dull starter stud through skin using mechanical force. This causes blunt-force trauma, crushes tissue margins, and can even shatter delicate ear cartilage. Furthermore, plastic piercing instruments cannot be dismantled and autoclaved at high temperatures, significantly increasing the risk of cross-contamination.
Healing Stages: Lobes vs. Cartilage
Healing is a progressive biological process that unfolds from the outside surface inward. The visible outer margins of skin seal and form new surface cells (epithelialization) weeks before the deeper internal fistula wall has fully matured and strengthened.
| Ear Piercing Zone | Initial Surface Healing | Full Maturation Period | Pain Rating (1–10) | Standard Initial Gauge |
|---|---|---|---|---|
| Standard / High Lobe | 6–8 Weeks | 3–6 Months | 2–4 / 10 | 18G – 20G |
| Helix / Forward Helix | 3–4 Months | 6–9 Months | 5–6 / 10 | 16G |
| Conch / Tragus / Flat | 4–6 Months | 6–12 Months | 5–7 / 10 | 16G (14G for Conch) |
| Daith / Rook | 6–8 Months | 9–12 Months | 6–8 / 10 | 16G |
| Snug / Industrial | 6–9 Months | 9–18 Months | 7–8 / 10 | 14G – 16G |
Safe Jewelry Materials and Sizing for Optimal Healing
The material sitting inside your fresh piercing directly influences cellular recovery. Up to 35% of people with ear piercings experience minor complications, with metal-induced contact allergies accounting for roughly 43% of those issues.
For initial starter jewelry, only non-porous, biocompatible metals should be used:
- Implant-Grade Titanium (ASTM F136): The gold standard for initial piercings. Titanium contains zero nickel, is lightweight, and will not corrode when exposed to bodily fluids.
- Solid 14k or 18k Gold: Nickel-free solid yellow, rose, or white gold is biocompatible and safe for initial healing. Gold-plated, gold-vermeil, or gold-filled items should never be used in fresh wounds, as micro-thin surface plating flakes off and exposes irritating base metals.
- Implant-Grade Stainless Steel (ASTM F138): Highly polished and corrosion-resistant, though individuals with known nickel sensitivities should exercise caution.
- Niobium & Biocompatible Borosilicate Glass: Inert, metal-free options ideal for sensitive individuals.
Initial piercings are intentionally fitted with slightly longer flat-back labret posts (typically 8mm) to allow room for natural tissue swelling. Once initial swelling subsides—usually around 4 to 8 weeks—you must visit your piercer for a downsize adjustment. Swapping to a snug post (5.5mm to 6.5mm) prevents the jewelry from snagging on hair and stops the healing channel from shifting to an uneven angle. Internally threaded or threadless push-pin designs are strongly preferred over externally threaded jewelry, as they glide through delicate skin without scratching healing tissue.
Cleaning Protocols, Infection Signs, and Complication Management
Proper wound aftercare requires patience and a hands-off approach. Clinical guidance from the New Ear Piercing: Healing and Aftercare guidelines stresses that modern piercing care avoids harsh chemicals in favor of gentle, balanced saline rinses.
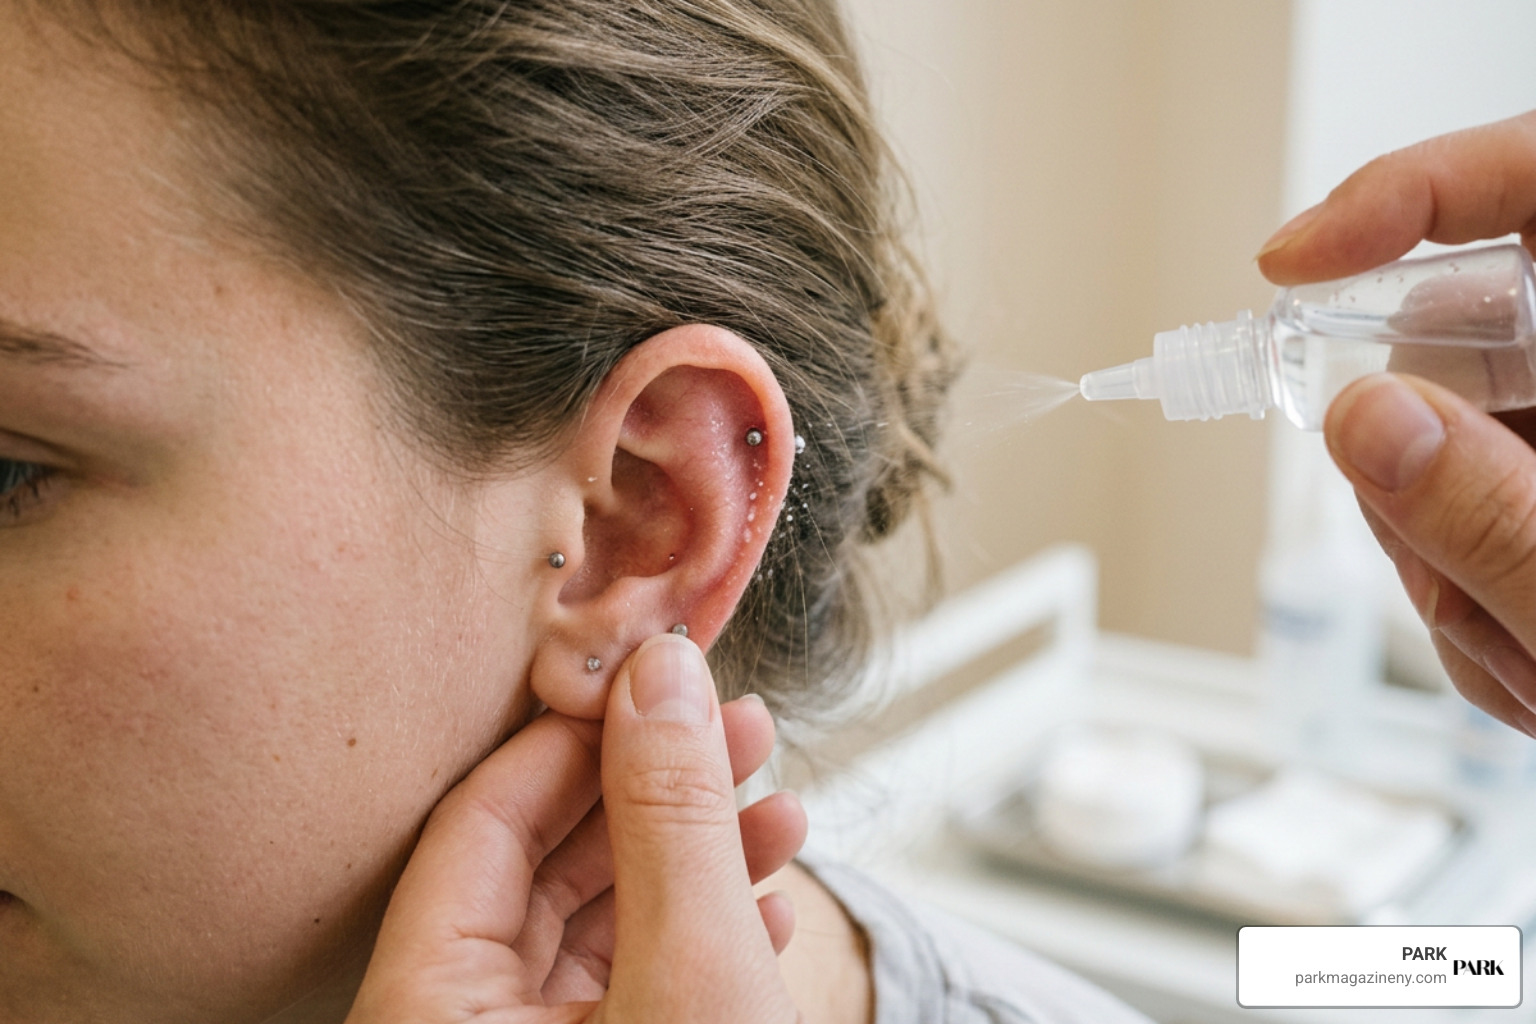
Essential Aftercare for New Ear Piercings
- Clean with 0.9% Sterile Saline Spray: Spray the front and back of the piercing site twice daily with a preservative-free sterile sodium chloride mist.
- The Hands-Off Rule: Do not twist, spin, or rotate your jewelry. Spinning disrupts delicate cellular growth inside the channel and introduces bacteria from your fingers.
- Pat Dry with Sterile Gauze: Moisture invites bacterial growth. Gently dry the area using sterile non-woven gauze or the cool setting of a hair dryer. Avoid cotton swabs, as loose fibers can tangle around posts.
- Protect Your Sleep: Never sleep directly on fresh cartilage piercings. Use a donut-style travel pillow and position your ear inside the central opening to eliminate direct pressure.
- Avoid Submerging in Water: Keep healing ears out of swimming pools, hot tubs, baths, and ocean water to prevent introducing waterborne bacteria.
Managing Complications: Irritation Bumps, Infections, and Keloids
Distinguishing between minor irritation, active bacterial infection, and true scar tissue ensures you take the right corrective steps quickly:
- Irritation Bumps: Small, raised fluid bumps that develop when jewelry snags, shifts under sleeping pressure, or encounters harsh chemicals. These resolve naturally once the underlying irritant is removed, jewelry is downsized, and regular saline care is maintained.
- Localized Infections: Marked by spreading dark redness, throbbing heat, continuous swelling, and opaque yellow-green purulent discharge. If you develop a fever or severe swelling, consult a medical professional immediately. Never remove the jewelry during an active infection, as the hole may close on the surface and trap bacteria inside an abscess.
- Keloids and Hypertrophic Scars: Unlike standard irritation bumps, keloids represent genetic overgrowths of fibrous scar tissue that expand beyond the original wound boundary. Individuals prone to excessive scarring should understand the underlying biology behind these growths, as detailed in our guide on From Piercings To Acne Scars What Causes Keloids And How To Treat Them Effectively, which outlines clinical management techniques.
Ear Curation: Designing a Cohesive Luxury Ear Stack
Ear curation transforms multiple piercings into an intentional, visually balanced work of art. Designing a curated ear stack reflects personal storytelling and aesthetics, celebrating Beauty Fashion And The Power Of Self Expression through fine materials and considered styling.
To build a balanced, elegant ear layout across multiple piercings, follow these foundational principles:
- The 3:2 Styling Rule: Rather than creating matching, symmetrical arrangements on both ears, curate an intentional balance of odd numbers—such as three piercings on one ear and two on the other. This asymmetrical contrast creates dynamic visual interest.
- Establish a Visual Focal Anchor: Place your largest, boldest piece—such as a diamond hoop or sculptural drop earring—in the first lobe. As you move upward along the lobe and outer cartilage rim, graduate downward in scale toward smaller gemstones, micro-huggie rings, and delicate flat-back studs.
- Zone Distribution: Balance outer rim accents (helix, flat) with inner ear centerpieces (conch, daith) so the ear never looks cluttered in one concentrated area.
- Mixed Metal Harmony: If blending warm gold with cool platinum or white gold, establish one primary dominant metal (roughly 70% of your stack) and weave the complementary secondary tone in as deliberate accent highlights.
Creating a refined collection that feels authentically yours enhances everyday presence and self-assurance, connecting closely to The Psychology Of Body Confidence How Treatments Can Help when expressing individual beauty.
Frequently Asked Questions
How many piercings can you safely get in one session?
Most professional piercers recommend limiting appointments to two to three lobe piercings or no more than two cartilage piercings per session. Creating too many puncture wounds at once taxes your immune system, raises systemic inflammation, and prolongs total healing time for every site involved.
When can you safely change your starter earring for the first time?
You can safely swap starter jewelry once the internal tissue channel has fully healed—roughly 6 to 8 weeks for standard lobes and 6 to 12 months for cartilage placements. A scheduled jewelry downsize with your piercer after 4 to 8 weeks is not an early fashion swap; it is a professional adjustment to ensure proper alignment.
Does getting a daith piercing actually help relieve migraine pain?
There is no definitive clinical evidence proving that daith piercings cure or prevent migraines. While the placement aligns with an acupuncture pressure point linked to the vagus nerve, medical organizations attribute reported headache relief primarily to the temporary placebo effect.
Conclusion
Ear piercings have evolved into an enduring fine jewelry art form. Crafting an intentional collection requires patience, anatomical awareness, and uncompromising standards for sterile technique and body-safe metals. Whether you are stepping in for a classic first lobe placement or assembling a multi-tiered cartilage constellation, respecting the biological healing process ensures your ear project remains vibrant for decades.
As you plan your upcoming styling upgrades, explore our curated edit on luxury fine jewelry investments to discover timeless, heirloom-grade pieces crafted to elevate your look for years to come.