
Write It Right: How Do You Make Out a Check
Write It Right: How Do You Make Out a Check
Make Out a Check in Six Simple Steps
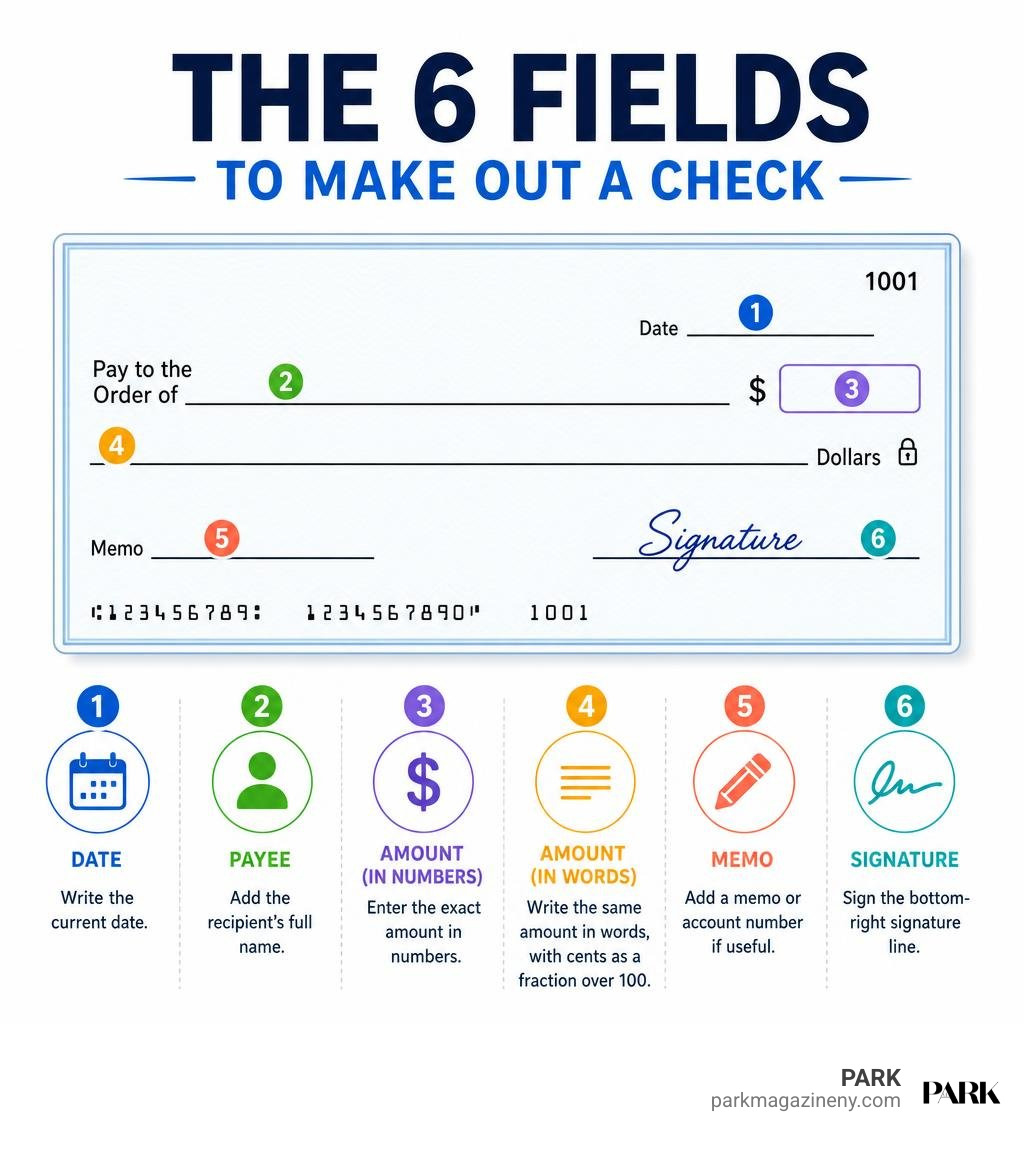
To make out a check, use blue or black permanent ink and complete these six fields:
- Write the current date.
- Add the recipient’s full name on the “Pay to the Order of” line.
- Enter the exact amount in numbers.
- Write the same amount in words, with cents as a fraction over 100.
- Add a memo or account number if useful.
- Sign the bottom-right signature line.
Check that both amounts match before handing it over. If they conflict, the written-out amount generally controls. Fill blank space on the amount line with a horizontal line to make alteration harder.
Paper checks still work well for rent, contractors, gifts, and payments that need a clear paper record. The key is accuracy: a missing signature, vague payee, or mismatched amount can delay payment or create a fraud risk.
I am W.A. Muller, and next we will walk through each part of the check so you can write one with confidence.
Step-by-Step: How Do You Make Out a Check Correctly?
Understanding the physical check layout helps ensure every transaction processes smoothly without bank rejections. A personal check is a negotiable legal document that instructs your financial institution to transfer funds from your checking account to a designated payee. Modern banks use Optical Character Recognition (OCR) technology alongside human review to process these payments. If your handwriting is illegible or essential required fields are skipped, automated scanning software can misread the amount or flag the item for manual investigation.
Always use a permanent blue or black ink pen rather than a pencil or erasable marker when filling out your checks. Pens with pigment-based dark ink bond directly with the paper fibers, making it nearly impossible for criminals to alter details.
Step 1: Add the Current Date
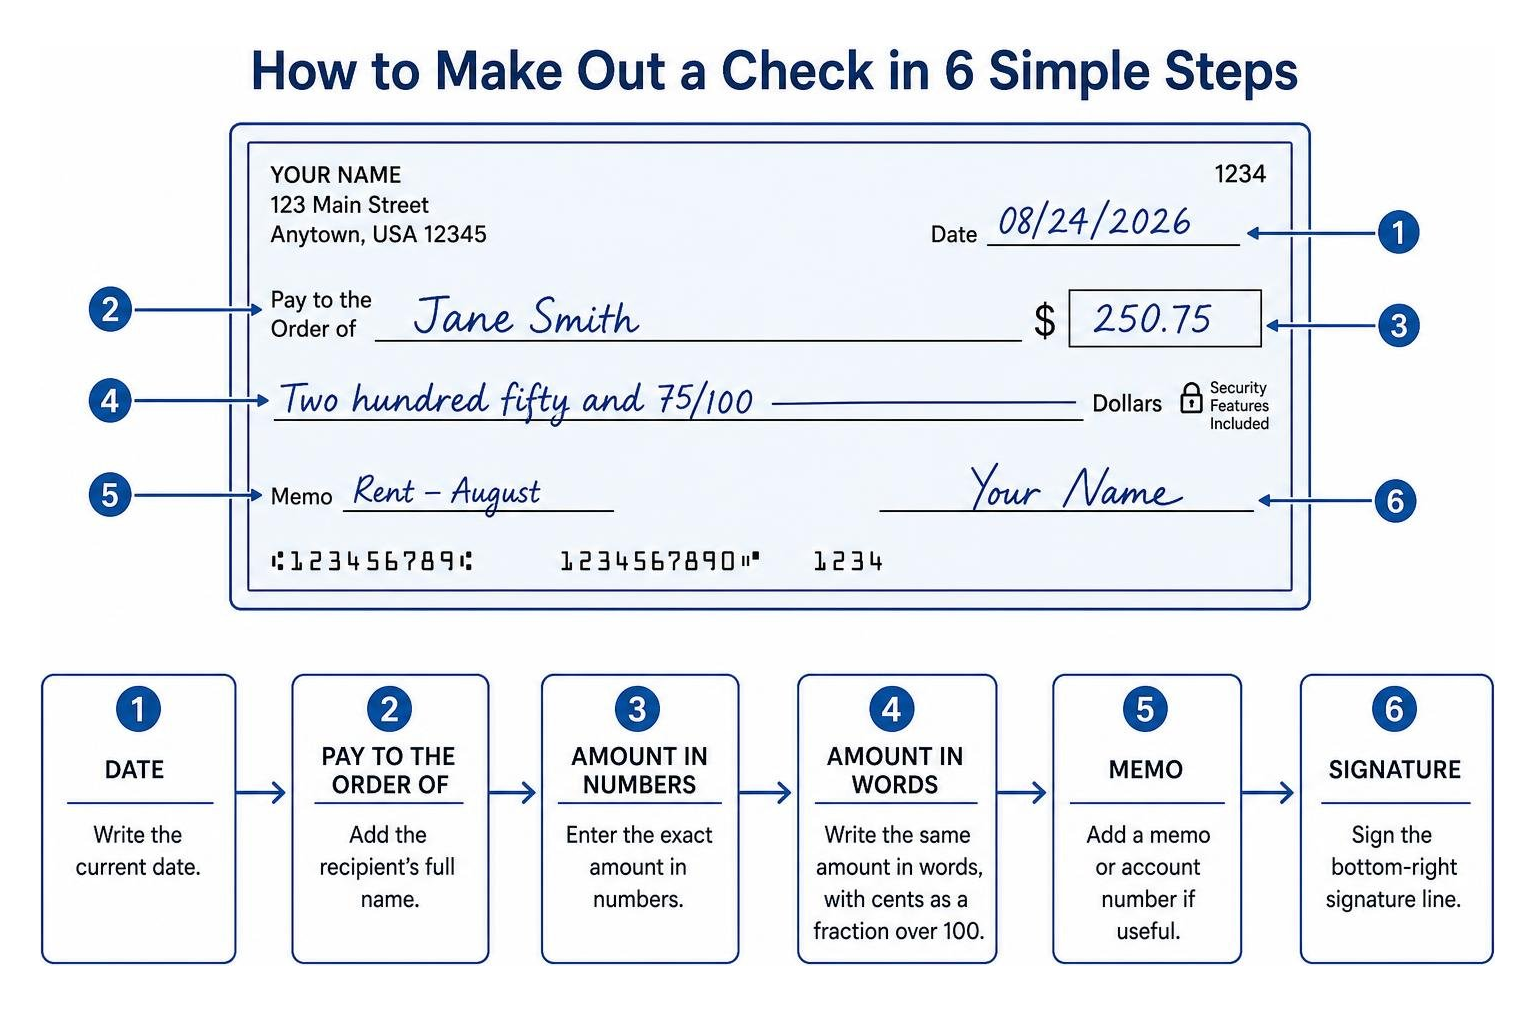
Locate the blank date line situated in the upper right-hand corner of the check. Record the exact date you issue the payment. You can format this using numbers (such as 08/24/2026) or by spelling out the full month name (such as August 24, 2026). Writing out the full month provides extra security because it prevents fraudsters from turning a single-digit month into a double-digit date.
A check is legally classified as a “payable on demand” financial instrument. This means it becomes negotiable the moment you sign and deliver it. Avoid the temptation to write a future date in hopes of delaying the withdrawal. Postdating carries major practical risks because banks are often legally permitted to process checks as soon as they receive them, regardless of the date printed on the face.
Step 2: Name the Payee on the Order Line
The second line on your check typically begins with the phrase “Pay to the order of.” This is where you specify the legal recipient name—whether that party is an individual person, a utility provider, a government department, or a registered business entity.
Print the recipient’s full legal name clearly across the line. Avoid using shorthand abbreviations, corporate nicknames, or vague acronyms that could cause teller confusion or deposit delays. When writing a check to an individual, include formal generational designations like “Jr.” or “III” if applicable. If you are issuing funds to a registered company, verify their exact commercial business entity name before putting pen to paper.
Step 3: Write the Numerical Dollar Amount
To the right of the payee line sits a small, framed dollar box preceded by a pre-printed dollar sign ($). This field is where you write the numeric amount of the transaction.
When entering this figure, align your first digit tightly against the left edge of the box. Always include both dollars and cents separated by a clear decimal point, such as writing “130.45” or “500.00.” Placing your digits flush against the left border ensures unauthorized third parties cannot squeeze extra digits in front of your intended sum to inflate the payment amount.
Step 4: Write the Legal Amount in Words
Directly beneath the payee line is a long, blank line ending with the printed word “Dollars.” This is the legal amount line, and it holds the most critical legal weight on the entire document.
Spell out the whole dollar amount using plain, printed words. Once you complete the dollar portion, write the word “and,” followed immediately by the cents expressed as a fraction over 100 (for example, “45/100”). The word “and” should only appear once on this line, acting as the decimal marker between dollars and cents. After writing out the full monetary sum, draw a solid, straight horizontal line from the end of your text all the way to the right edge. This eliminates empty white space where someone could fraudulently add words. Under official Consumer Financial Protection Bureau guidelines, the amount written in words governs the payment if there is ever a dispute between the numbers and the text.
Step 5: Fill in the Optional Memo Line
The memo field is located in the lower left corner of the check. While leaving this field blank will not prevent your check from clearing, utilizing the memo line creates an invaluable paper trail for both personal budgeting and administrative tracking.
Use this space to document reference details such as invoice numbers, monthly utility account identifiers, or notes like “August Rent Unit 4B.” When paying government obligations, specialized notations are essential. For example, if you Pay estimated tax by check, state tax authorities instruct taxpayers to write their Social Security number, the tax year, and the specific form identifier directly across the memo line to ensure accurate account crediting. That while memo lines are excellent for personal records, informal restrictive notes like “paid in full” or “void after 30 days” do not legally bind processing banks.
Step 6: Sign the Signature Line
The final step is signing your legal name on the signature line positioned in the bottom right corner. Never sign a check until all other five fields are fully completed. An unsigned check is merely scrap paper, but a pre-signed blank check is an open invitation for financial loss.
Your signature must closely match the authorized signature card your bank maintains on file. If your signature appears wildly irregular, automated fraud algorithms or bank tellers might flag and reject the transaction. Once signed, the check becomes fully negotiable and ready for presentation. Before handing it over or sealing the envelope, take five seconds to perform a final review: confirm the date is accurate, the payee spelling is correct, the numeric box matches the spelled-out words, and the signature line is complete.
How to Handle Cents, Round Amounts, and Discrepancies
Drafting fractional amounts and round numbers requires specific conventions to maintain clarity and prevent banking disputes. When you wonder how do you make out a check that leaves no room for ambiguity, following consistent fractional standards protects your balance.

How Do You Make Out a Check for Cents and Whole Dollars?
Whenever you write a check that includes cents, always represent the change portion as a fraction over 100 on the legal amount line. For instance, an amount of $236.79 should be written as:
Two hundred thirty-six and 79/100
If your check is for an even, whole-dollar amount with zero cents, never leave the cents portion blank or simply write the word “even.” Instead, clearly mark the zero-cent balance as “00/100”, “no/100”, or “xx/100.” In the numeric box, always include a decimal point followed by two zeros (e.g., “$200.00”). Formatting whole amounts as “Two hundred and 00/100” prevents anyone from altering the payment to include unauthorized cents.
| Numeric Amount | Written Legal Amount Format | Protective Line Treatment |
|---|---|---|
| $20.00 | Twenty and 00/100 | Twenty and 00/100——————– |
| $44.99 | Forty-four and 99/100 | Forty-four and 99/100—————– |
| $105.50 | One hundred five and 50/100 | One hundred five and 50/100———- |
| $375.62 | Three hundred seventy-five and 62/100 | Three hundred seventy-five and 62/100- |
| $1,250.75 | One thousand two hundred fifty and 75/100 | One thousand two hundred fifty and 75/100- |
Resolving Differences Between Words and Numbers
It happens to the best of us: you write “$150.00” in the numerical box, but your hand spells out “One hundred five and 00/100” on the line below. What happens when these two values disagree?
Under the Uniform Commercial Code and Consumer Financial Protection Bureau standards, the legal amount written in words takes precedence over the numeric box. Financial institutions and automated processing clearinghouses are legally obligated to honor the spelled-out words because text is significantly harder to alter or accidentally miswrite than quick numerals. If a significant discrepancy exists, the bank may either process the check for the written-word sum or reject the item entirely, returning it unpaid due to conflicting terms.
Security Best Practices and Avoiding Check Fraud
Check fraud remains an active threat. The Financial Crimes Enforcement Network (FinCEN) has repeatedly warned financial institutions that mail theft and sophisticated check-washing operations have risen sharply in recent years. Criminals steal envelopes from outdoor collection boxes, use household solvents to erase the payee name and dollar values, and rewrite the check for thousands of dollars.

Protect your checking balance by incorporating these protective habits into your payment routine:
- Write Exclusively with Dark Gel Pens: Pigment-based black or blue gel ink penetrates cellulose fibers deeper than standard oil-based ballpoint ink, making chemical check washing virtually impossible.
- Never Leave White Space: Fill all open gaps on the payee and written amount lines with a bold trailing line, and align numeric digits tight against the left box margin.
- Mail Checks Inside Secure Facilities: Avoid dropping envelopes containing checks into outdoor blue street boxes or leaving them in an unmonitored residential mailbox. Drop outgoing mail directly inside an official U.S. Postal Service lobby.
- Keep Physical Checkbooks Locked Away: Treat your blank checkbook like cash. Leaving checks exposed on a desk reveals your bank routing transit number and personal account number to anyone passing by.
- Never Sign Blank Checks: Signing a blank check exposes you to unlimited financial liability if the document is lost or intercepted.
How to Properly Void a Check
If you make an error while drafting a check, or if an employer requests a voided check to set up automatic direct deposit, you must disable the check’s financial negotiability.
To void a check correctly:
- Use a dark, permanent blue or black pen.
- Write the word “VOID” in large, bold capital letters across the front of the check.
- Spread the lettering across the payee line, numeric dollar box, and signature area.
- If providing the check for direct deposit, do not write over the Magnetic Ink Character Recognition (MICR) line at the bottom. That bottom line contains your bank routing number, account number, and check number, which payroll systems need to scan.
- Record the voided check number in your ledger immediately. If the check was spoiled due to a writing mistake, shred it thoroughly rather than tossing it whole into the wastebasket.
How Do You Make Out a Check Safely to Multiple People or Cash?
Issuing a payment to multiple recipients requires attention to conjunctions:
- Using “And” (e.g., John Smith and Jane Smith): Both individuals must endorse the back of the check before a financial institution will deposit or cash the funds.
- Using “Or” (e.g., John Smith or Jane Smith): Either named party can endorse and deposit the check independently.
Making a check payable to “Cash” is also possible, but it presents severe security risks. Writing “Cash” on the payee line turns the check into bearer paper. Legally, bearer paper can be negotiated and cashed by whoever physically holds the item. If you lose a check made out to Cash on the sidewalk, anyone who picks it up can walk into a branch and claim the money. Reserve checks payable to Cash strictly for in-person branch withdrawals where you hand the check directly to a bank teller.
Balancing Your Checkbook and Managing Post-Writing Records
Writing the check is only half the process; recording the transaction ensures your financial records stay accurate and prevents unexpected overdraft fees.
Whenever you issue a payment, immediately record the transaction in your checkbook register, personal ledger, or mobile budgeting application. Document the check number, date written, payee name, memo description, and exact payment amount. Subtract the sum from your running balance immediately rather than waiting for the recipient to cash it.
Personal checks do not clear instantly. While electronic debit card transactions deduct funds within seconds, paper checks depend entirely on when the recipient visits a bank or uses mobile deposit. Most personal checks are considered stale-dated if they aren’t cashed within six months (180 days) from the date written. While banks have the legal discretion to refuse stale-dated items, they may still choose to honor them if they believe the transaction was made in good faith. In contrast, government-issued U.S. Treasury checks typically remain valid for one full year. Reconciling your monthly bank statement against your register helps you spot uncashed checks, catch unauthorized withdrawals, and keep your financial health intact.
Frequently Asked Questions About Writing Checks
Can you postdate a check to delay payment?
While you can physically write a future date on the date line, postdating does not legally guarantee that your bank or the recipient will wait to process the payment. Under standard banking practices, checks are payable on demand. If the payee presents the check early, many banks will process and clear the item immediately. If your account lacks sufficient available funds when the check is presented, you could face overdraft charges unless you have filed a formal, fee-based stop payment order with your financial institution.
What happens if a check bounces due to insufficient funds?
A check bounces when the issuer’s account does not possess sufficient available funds to cover the drafted amount. When this occurs, the clearing bank returns the check unpaid as a Non-Sufficient Funds (NSF) item. Bouncing a check can trigger substantial penalty fees from your bank, returned-check charges from the merchant, negative reporting to checking verification databases, and potential legal complications if the check was issued with fraudulent intent.
Do personal checks expire after a certain amount of time?
Yes. Under standard commercial banking regulations, personal checks become stale-dated after six months (180 days) from the date written on the check. Financial institutions are not legally obligated to honor checks presented after this 180-day window, though state laws and individual bank policies vary regarding whether a bank may still process them. For comparison, federal government checks issued by the U.S. Treasury generally remain valid for up to one year.
Conclusion
Mastering how to draft a paper check correctly is a foundational personal finance skill that provides security, clarity, and peace of mind. Whether you are paying your monthly rent, hiring an independent contractor, or gifting funds to loved ones for a celebration, precise formatting ensures your money moves safely from your account to the intended recipient without delay or administrative headaches.
At PARK Ave Magazine, we appreciate how mastering foundational everyday details empowers you across all aspects of life—from managing your personal finances and discovering regional lifestyle trends to exploring technical innovations like precision in precipitation monitoring. By taking a few extra moments to use permanent dark ink, fill out every required field completely, strike through open space, and log your records diligently, you protect your hard-earned funds with confidence every time you write a check.