

6 Essential Rules on How to Fill Out a Business Check
How to Fill Out a Business Check Correctly
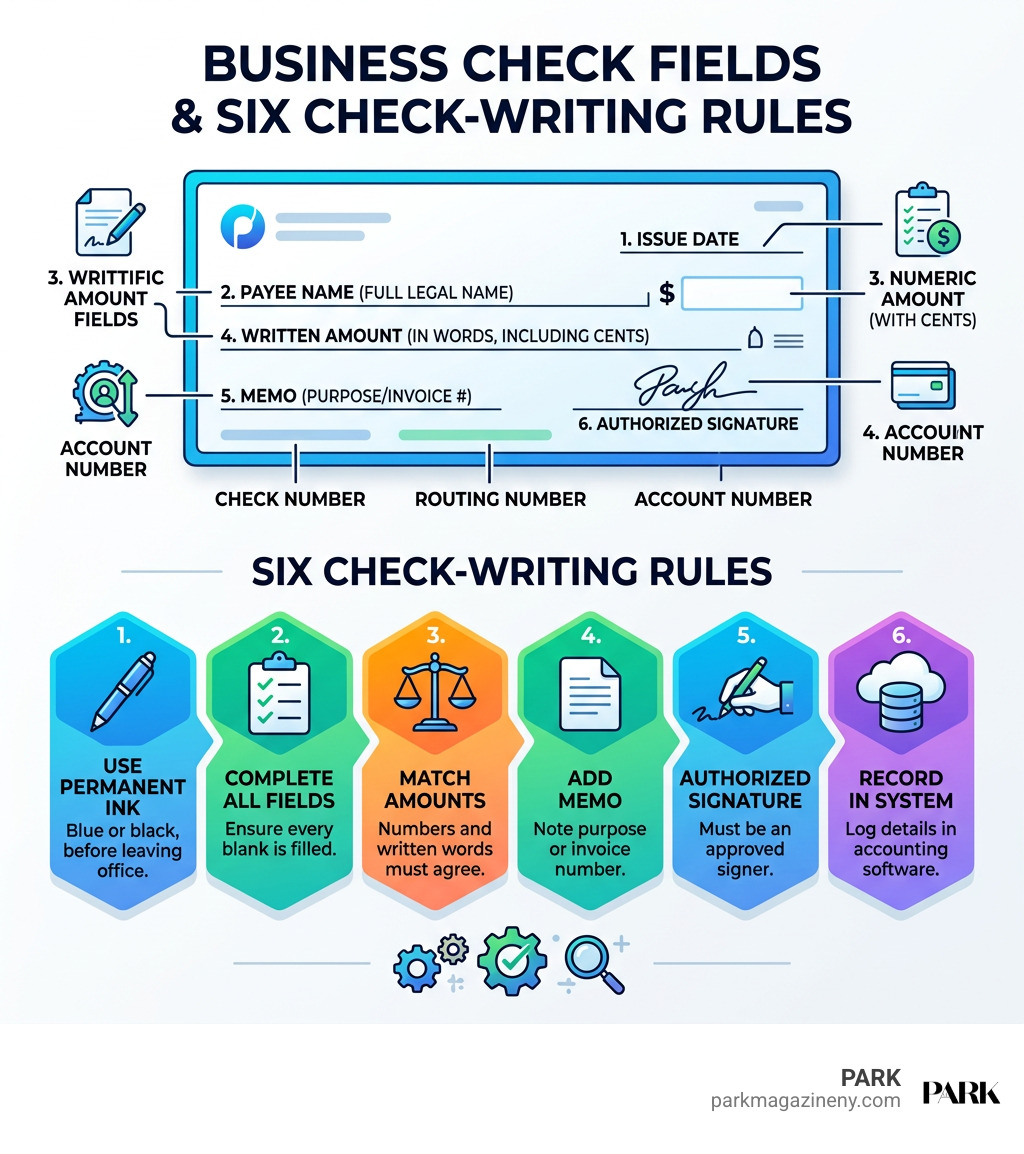
To fill out a business check, use permanent blue or black ink and complete each field before it leaves your office:
- Write the issue date.
- Enter the payee’s full legal name.
- Write the amount in numbers and then in words, including cents.
- Add an invoice number or payment purpose in the memo line.
- Have an authorized signer sign it.
- Record the check number, payee, amount, date, and expense category in your accounting system.
Check the written and numeric amounts closely. If they conflict, the written amount generally controls under UCC Article 3, Section 114. Avoid blank spaces, and draw a line after the written amount to reduce the chance of alteration.
A properly completed business check creates a clear payment trail for vendors, bookkeeping, tax records, and bank reconciliation. The six rules below cover the practical details, from authorized signatures and owner draws to voided checks and fraud prevention.
I am W.A. Muller, and I will walk you through the fields and safeguards that make every business check accurate and defensible.
Learn more about how to fill out a business check:
Understanding Check Anatomy: Business Checks vs. Personal Checks
Operating in New York means running a tight financial ship. Whether we are paying a freelance art director in SoHo, a printer in Long Island City, or a contractor renovating a gallery space, the tools we use to disburse company funds matter. While a personal check simply draws money from an individual account, a commercial check is a legally binding corporate disbursement instrument designed with layered security and comprehensive record-keeping mechanisms.
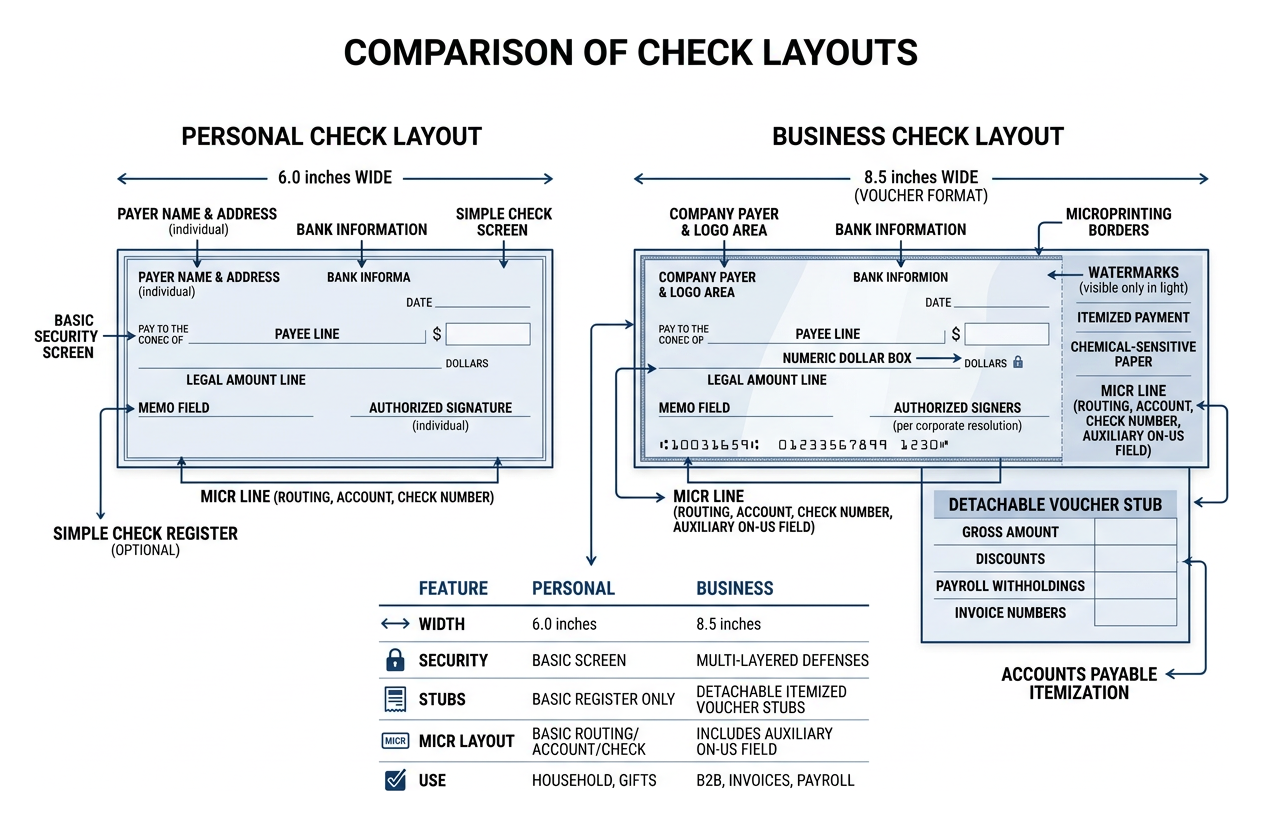
At a glance, business checks are physically larger than standard personal checks. While personal checks measure 6 inches wide, commercial voucher checks are typically 8.5 inches wide, designed specifically to feed through commercial laser printers and bind neatly into three-ring office ledgers.
Every commercial check contains three critical functional zones:
- The Payer and Bank Information Header: Located in the upper left, displaying the company’s full legal entity name, corporate address, logo, and the issuing financial institution’s details.
- The Negotiable Instrument Body: The core section containing the issue date, payee line, numeric dollar box, legal amount line, memo field, and authorized signature line.
- The MICR (Magnetic Ink Character Recognition) Line: The specialized machine-readable numbers across the bottom edge. On a business check, this line contains the nine-digit American Bankers Association (ABA) routing transit number, the business checking account number, the check number, and often an auxiliary on-us field that provides additional internal account coding for commercial processing.
Many business checks also feature detachable voucher stubs (often arranged as top-check, middle-check, or 3-per-page formats). These stubs allow accounts payable teams to itemize gross payments, net amounts, discounts, payroll withholdings, and specific invoice numbers directly alongside the physical payment.
Commercial check stock incorporates robust defense mechanisms against check washing and counterfeiting. Premium business checks utilize chemical-sensitive paper that stains if exposed to solvents, true watermarks visible only when held to light, microprinting along the borders that blurs when photocopied, and heat-sensitive thermochromic ink.
| Feature | Personal Check | Business Check |
|---|---|---|
| Standard Width | 6.0 inches | 8.5 inches (voucher format) |
| Security Features | Basic security screen | Multi-layered: microprinting, chemical wash protection, watermarks |
| Accounting Stubs | None (standard register only) | Detachable itemized voucher stubs |
| MICR Layout | Routing, account, check number | Routing, account, check number, plus auxiliary on-us field |
| Signing Authority | Individual account holder | Authorized signers defined by corporate banking resolution |
| Primary Use | Household expenses, gifts | Vendor invoices, B2B settlements, payroll, contractor disbursements |
Step-by-Step Guide on How to Fill Out a Business Check

When preparing checks manually, tool selection is your first line of defense. Never use pencil or erasable ballpoint pens; doing so invites check alteration. We always recommend using a non-erasable, non-fading black or dark blue gel ink pen. High-pigment gel ink embeds deeply into the paper fibers, making chemical washing virtually impossible.
Step 1 to Step 3: Date, Payee, and Numeric Amount
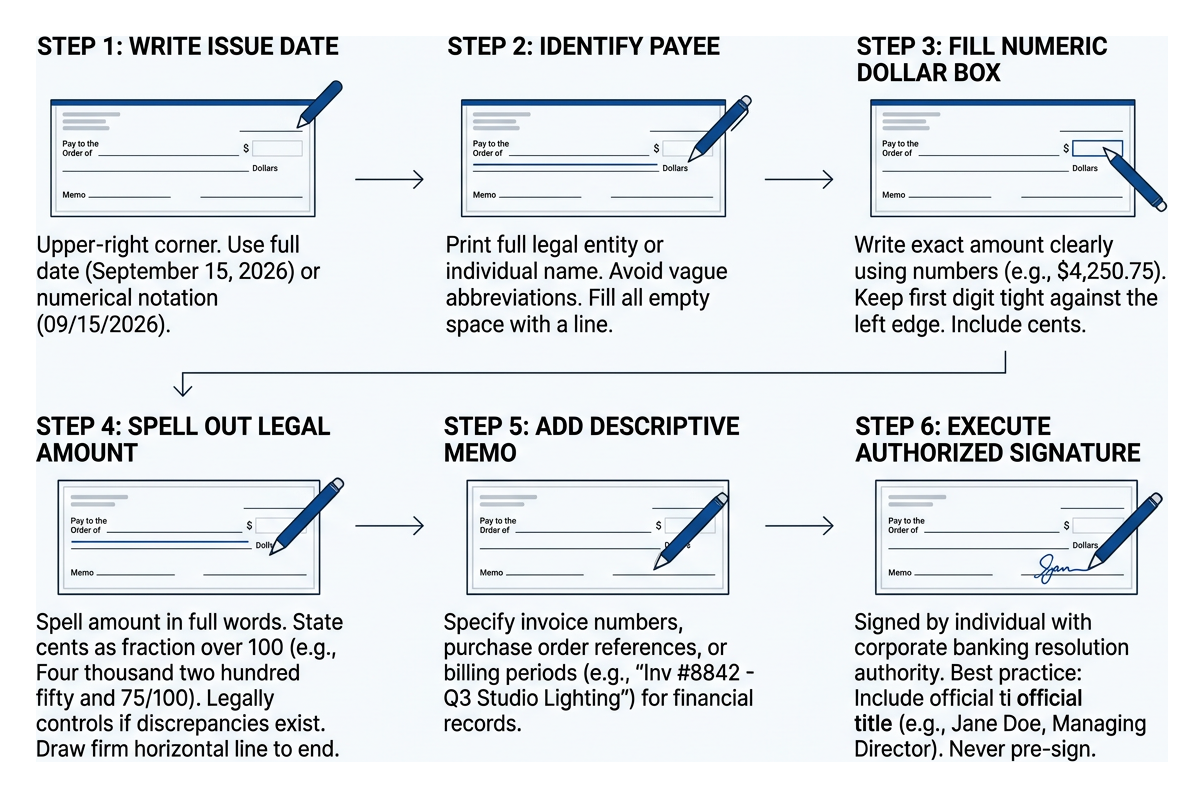
- Write the Issue Date: In the upper-right corner, write out the current date using either a full date format (e.g., September 15, 2026) or standard numerical notation (09/15/2026). Always use the exact date you issue the payment. While post-dating a check (writing a future date) is technically permissible, banks are generally under no legal obligation to delay processing if the payee presents it immediately.
- Identify the Payee: On the “Pay to the Order of” line, print the payee’s full legal entity name or individual legal name. Avoid vague abbreviations or informal nicknames (e.g., write “Metropolitan Office Supply, Inc.” rather than “Metro Office”). Never leave blank space before or after the payee name; draw a clean horizontal line from the end of the name to the dollar box to prevent third parties from appending unauthorized names.
- Fill in the Numeric Dollar Box: Locate the small box with the pre-printed dollar sign on the right side. Write the exact payment amount clearly using numbers, with commas separating thousands and a clear decimal point (e.g., $4,250.75). Keep the first digit tight against the left edge of the box to prevent anyone from inserting an extra digit. Always include cents, even for whole amounts (e.g., $4,250.00).
Step 4 to Step 6: Written Legal Amount, Memo Line, and Signature
- Spell Out the Legal Amount in Words: The middle line ending with the word “Dollars” is the legally governing line of the check. Under Uniform Commercial Code (UCC) Article 3, Section 114, if there is any discrepancy between the numbers in the box and the words on this line, the written words legally control. Write the dollar amount in full words, state the cents as a fraction over 100, and draw a firm horizontal line through all remaining empty space to the right margin:
- $4,250.75 becomes:
Four thousand two hundred fifty and 75/100 ----------------------- - $1,200.00 becomes:
One thousand two hundred and 00/100 -----------------------------(Note: You do not need to write the word “Dollars” at the end if it is pre-printed on the check stock).
- $4,250.75 becomes:
- Add Descriptive Context in the Memo Line: The memo field in the lower-left corner functions as the subject line for your financial records. Use it to specify invoice numbers, purchase order references, customer account IDs, or service billing periods (e.g., “Inv #8842 – Q3 Studio Lighting”). This ensures the payee’s accounts receivable team credits the correct account without delay.
- Execute the Authorized Signature: The check must be signed on the lower-right line by an individual granted signing authority under the business’s formal corporate banking resolution. To make it clear that the signer is executing the document in a corporate capacity rather than assuming personal liability, it is best practice to include your official title (e.g., “Jane Doe, Managing Director”). Never pre-sign blank checks under any circumstances.
Six Essential Rules for Business Check Security and Record-Keeping

Rule 1: Master the Written Legal Amount and Cents Formatting
The legal amount line leaves no room for ambiguity. Every dollar figure must be written out completely, followed by the exact cent value expressed as a fraction of 100 (XX/100).
By immediately drawing a horizontal line across the remainder of the legal amount line, you eliminate the blank space that check fraudsters rely on to insert additional dollar terms (such as turning “Eight hundred” into “Eight hundred fifty”).
Rule 2: Enforce Authorized Signers and Dual-Signature Protocols
A business check is only valid if signed by an individual documented on the company’s official signature card on file with the bank. Establishing rigorous internal financial controls is vital for protecting capital.
Many growing enterprises establish a dual-signature threshold in their corporate bylaws:
- Checks under $5,000 require a single authorized signature (e.g., Controller or Office Manager).
- Checks exceeding $5,000 require two distinct signatures (e.g., Chief Financial Officer and Managing Partner).
If your business uses an automated signature stamp for recurring accounts payable runs, the physical stamp must be locked in a secure safe with restricted access and logged in a physical audit register each time it is deployed.
Rule 3: Maintain Accounting Records and Comply with 1099-NEC Thresholds
A check is not complete until it is recorded in your general ledger or accounting software. Log the check number, date of issuance, payee name, gross payment amount, and specific expense chart of accounts category before the check leaves the office.
For the 2026 tax year, if your business pays $2,000 or more to an unincorporated non-employee, independent contractor, or freelancer for services during the calendar year, you are legally required to file Form 1099-NEC with the Internal Revenue Service (IRS). Keeping meticulous memo notes and digital scans of every disbursed voucher check makes annual tax reporting seamless.
Ensure your record retention policies comply with statutory limits:
- The IRS requires businesses to maintain supporting payment records for at least three years from the date the return is filed.
- If gross income is underreported by more than 25%, the audit window expands to six years.
- Employment tax and payroll records carry a mandatory four-year minimum retention period.
For localized administrative protocols, review the official NYC business requirements guide to verify city-specific compliance mandates.
Rule 4: Handle Mistakes Correctly with Voiding and Stop Payments
If you make a spelling error, miscalculate a figure, or smudge ink while writing a check, do not attempt to write over it or use correction fluid. Banks routinely reject altered checks to mitigate fraud liability.
How to Properly Void a Check:
- Write the word “VOID” in large, bold letters across the front of the check in permanent marker, ensuring you cover the numeric amount box, legal line, and signature area without obliterating the check number.
- Deface the MICR line along the bottom.
- Record the check number in your register as “VOID” to maintain numerical continuity in your check sequence.
- File the physical voided check in your cancelled checks folder or shred it according to your company’s document destruction policy.
If a check is lost in transit or stolen, issue an immediate Stop Payment Order with your bank. Keep these legal timelines in mind:
- An oral stop payment order expires after 14 days unless confirmed in writing.
- A written stop payment order remains legally active for six months and can be renewed in six-month increments.
- Financial institutions typically charge between $15 and $36 per stop payment request, with most major commercial banks averaging around $30.
Rule 5: Manage Owner Draws and Endorsement Rules
Business owners often need to transfer funds from company accounts to personal accounts. When writing an owner draw or distribution check to yourself:
- Make the check payable to your individual legal name.
- Write “Owner Draw – Equity Distribution” or “Approved Expense Reimbursement” clearly in the memo field.
- Never write checks payable to “Cash.” A check made out to cash is a bearer instrument; anyone who holds it can deposit or cash it without verification if lost.
When receiving and depositing incoming business checks, implement secure endorsement practices on the back:
- Restrictive Endorsement (Most Secure): Write “For Deposit Only to Account #[Your Company Account Number]” followed by the company’s legal name and your signature. This prevents the check from being cashed or endorsed over to third parties.
- Mobile Remote Deposit: When depositing via commercial banking apps, write “For Mobile Deposit Only” beneath your signature or mark the designated mobile deposit checkbox to satisfy federal banking processing guidelines.
Rule 6: Track Stale-Dated Checks and Prevent Fraud
Under the Uniform Commercial Code, checks become stale-dated after six months (180 days) from their issue date. After 180 days, banks are no longer legally obligated to honor the check, although they retain discretionary authority to process it if they believe the payment was made in good faith. Regularly reconcile your monthly bank statements to identify uncashed checks and contact vendors before items reach stale-date status.
To safeguard outbound commercial disbursements against interception:
- Enroll in Positive Pay, an automated fraud-prevention service offered by commercial banks that matches the check number, dollar amount, and payee of every presented check against a daily electronic issuance log uploaded by your company.
- Mail checks exclusively in security-tinted, double-window envelopes that conceal the check details from external light.
- Use certified mail with tracking for high-value supplier disbursements.
Frequently Asked Questions About How to Fill Out a Business Check
Can you make a mistake and correct it when learning how to fill out a business check?
No. Never cross out a number, write over a misspelled payee name, or use correction fluid on a business check. Bank automated scanning systems and fraud algorithms flag altered checks immediately, which can result in returned item fees, delayed vendor payments, and administrative scrutiny. If you make an error, write “VOID” across the face in permanent marker, log the voided check number in your accounting software to keep your sequential check register intact, and issue a fresh check.
Can an owner write a check to themselves when mastering how to fill out a business check?
Yes, business owners can issue checks to themselves, provided the payment is categorized correctly for tax and legal purposes. Enter your individual legal name on the payee line, complete the standard numeric and written amounts, and clearly document the purpose in the memo line—such as “Owner Draw,” “Shareholder Distribution,” or “Travel Expense Reimbursement.” Documenting the transaction prevents commingling of personal and business finances, preserving corporate veil protection for LLCs and corporations.
What happens if a business check is deposited after six months?
A check that remains uncashed after six months (180 days) is classified as stale-dated. Under commercial banking regulations, your financial institution is not legally required to pay a stale-dated check. However, the underlying contractual debt does not vanish. If a vendor attempts to deposit an expired check and it is returned unpaid, your company must verify whether the funds were previously settled, void the initial entry in your accounting ledger, and issue a replacement check.
Conclusion
Mastering commercial disbursements is essential for clean accounting, airtight audit defense, and seamless vendor relationships. By executing each field precisely, enforcing dual signatures on high-value disbursements, logging check numbers immediately, and leveraging services like Positive Pay, you protect your enterprise against costly payment errors and modern check fraud.
At PARK Ave Magazine LLC, we believe that operational excellence is built on structural precision—a principle that applies whether you are managing corporate cash flows or exploring technical innovations like precision in precipitation monitoring. Treat every business check as an official legal record, protect your paper trails, and maintain the rigorous financial discipline your growing business deserves.