How to Build a Shipping Container Home
Building a shipping container home follows a clear sequence: plan the layout, check permissions, choose the right containers, prepare the foundations, make structural modifications, insulate properly, install utilities, and finish the interior. That sounds manageable, and it is. But each step depends on the one before it, and a mistake early on tends to cost more than the step itself.
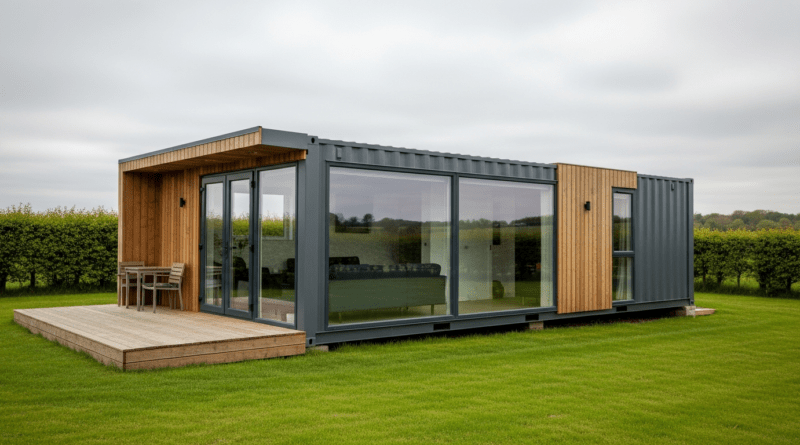
Container homes can be built faster than many traditional builds and offer a lot of design flexibility. The finished comfort, though, depends almost entirely on the quality of the conversion, not the container. Steel conducts heat and cold aggressively, which means insulation and ventilation are not finishing touches. They are fundamental to whether the building is actually livable.
If you are weighing up whether to manage the whole project yourself or work with a specialist, looking at Universal Containers shipping container homes is a useful way to understand what a professionally designed and finished container home can include.
| Build sequence at a glanceStep 1: Define the project and decide how much you will manage yourselfStep 2: Check planning permission and building regulations before anything elseStep 3: Choose and inspect the right containersStep 4: Prepare the site and build foundationsStep 5: Make structural modifications safelyStep 6: Insulate thoroughly and plan ventilationStep 7: Install utilitiesStep 8: Finish interior and exteriorStep 9: Inspect and sign off |
Step 1: Decide what kind of container home you want to build
Start with how you want to live
Single containers make compact, manageable homes. Two or three containers joined side by side or stacked open up larger layouts but increase structural complexity and cost. A few common starting points:
- Single-container compact home or annexe
- Multi-container family home with separate rooms and full facilities
- Garden annexe or home office with basic utilities
- Holiday let or short-term rental unit
The form follows function here. A holiday let and a permanent family home have very different insulation, utility, and compliance requirements. Getting clear on the project type early avoids redesigns later.
Think about size, layout, and future use
These decisions affect almost everything downstream: how many containers you need, whether standard or high-cube height suits the space, how complex the foundations will be, and how utilities route through the structure. Sketch the layout before buying anything.
DIY, part-managed, or fully built?
Some buyers handle everything themselves, pulling in tradespeople for electrical, plumbing, and structural work. Others manage the project but bring in a specialist for the conversion itself. A third option is buying a professionally finished unit.
Each route has different risks. DIY gives you the most control but leaves the most room for error. Specialist conversions cost more upfront but usually come with warranty and compliance support. For a permanent home, that is worth thinking about carefully.
Step 2: Check planning permission and building requirements
Don’t assume a container home is exempt
This is the step most people delay and most people regret delaying. In the UK, permanent residential use of a shipping container home is likely to need planning permission. Some temporary or low-impact structures may fall under permitted development, but that does not cover most container home projects.
The Planning Portal advises contacting your local planning authority before starting work on any project where you are unsure. Requirements vary by location, site designation, proximity to listed buildings, and how the structure will be used.
Why this step comes first
Permissions affect what you can build, where you can put it, and what standards it has to meet. Buying containers, laying foundations, and then discovering the project needs significant redesign to get approval is an expensive sequence. Check first.
Step 3: Choose the right shipping containers
New vs used
One-trip containers have crossed an ocean once. They are in near-new condition, easier to work with cosmetically, and tend to have better structural integrity. For a home, the extra cost is usually worth it.
Used containers can work, but condition varies considerably. A lower-grade unit with floor issues, patched walls, or a history of chemical cargo is not a good starting point for a home you plan to live in.
What to check before buying
- Structure: no significant distortion, bowing, or impact damage
- Rust: surface rust is manageable, deep corrosion is a problem
- Floor: check for soft spots, rot, and contamination from previous cargo
- Doors: should open, close, and seal properly
- Height: high-cube units add around a foot of internal headroom, which makes a real difference in a living space
Step 4: Prepare the site and build the foundations

Foundations are one of the earliest and most important technical decisions. Get them right before the container arrives.
Why foundations matter more than people expect
A shipping container home still needs a proper engineered base. Without it, you get uneven loading, structural twist, and door alignment problems that get worse over time. Foundations also manage drainage, frost movement, and the long-term stability of the structure.
Common foundation types
- Concrete piers: cost-effective, good for lighter loads and simpler layouts
- Strip footings: better for longer spans and heavier multi-container builds
- Full slab: the most stable option for permanent homes, especially on flat sites
The right choice depends on site conditions, soil type, and the weight of the finished build. A structural engineer or specialist contractor should advise here.
Access and placement
The container needs to arrive by lorry or crane. Check gate widths, overhead lines, and turning space before the delivery date. Orientation matters too: think about natural light, privacy, and where services will connect.
Step 5: Make structural modifications safely
Cutting openings changes the structure
Shipping containers are engineered to carry their loads through the corner posts and roof rails. When you cut large openings for windows, doors, or internal joins between containers, you change how those loads travel through the structure.
For small openings, the impact may be limited. For large windows, wide doors, or open-plan joins between two containers, structural reinforcement is usually required. A structural engineer should review any significant cutting work before it happens.
Common structural modifications
- Adding doors and windows of various sizes
- Joining two or more containers side by side with shared openings
- Removing wall sections for open-plan layouts
- Adding roof structures, cladding systems, or overhanging canopies
| Common mistakes to avoidCutting large openings without a structural engineer reviewing the work firstBuying containers before confirming planning permissionTreating insulation as optional rather than essentialUnderestimating delivery access requirements for the siteSkipping proper ventilation design, which leads to condensation and mould |
Step 6: Insulate the container and control condensation

Insulation is one of the most important decisions in the build. Steel transfers heat and cold directly, so this is not a step to cut corners on.
Why insulation is fundamental, not finishing
Steel is highly thermally conductive. An uninsulated container becomes an oven in summer and a freezer in winter. More practically, the temperature differential between inside and outside causes condensation to form on cold steel surfaces, which leads to rust, mould, and interior damage over time.
Insulation for a container home is not the same as insulating a brick building. You need to manage thermal bridging, which is heat transferring directly through the steel frame, not just through the wall panels.
Common insulation approaches
- Spray foam: bonds directly to steel, fills gaps, good thermal performance but makes future access harder
- Rigid board: effective and measurable, needs careful fitting around the frame
- Framed internal wall system: creates a gap between the container wall and the interior, allows service runs but reduces internal width
Ventilation matters as much as insulation
People generate moisture constantly: cooking, bathing, breathing. In a well-insulated steel box, that moisture has nowhere to go without a proper ventilation strategy. Mechanical ventilation with heat recovery (MVHR) is increasingly common in container homes for exactly this reason.
Poor ventilation in a well-insulated container leads to condensation, mould, and eventually structural damage. Design it in from the start.
Step 7: Install utilities and make it livable
Plumbing and drainage
Route plumbing before internal walls go up. Drainage needs to connect to mains or a suitable treatment system depending on the site. Container homes on rural plots sometimes use septic tanks or package treatment plants.
Electrical systems
Design the electrical layout alongside the insulation and internal wall plan. Cable routes need to be accessible and compliant. If the home will be permanently occupied, an electrical installation certificate will be required.
Heating, cooling, and hot water
A well-insulated container home does not need a large heating system, but it does need one. Air-source heat pumps work well in container homes and pair neatly with underfloor heating. Smaller units sometimes use efficient electric panel heaters.
Doors, windows, and interior finishes
This is where the container stops being a shell and starts functioning as a home. Good windows and well-sealed doors are both comfort and energy efficiency decisions. Glazing specification, u-values, and frame quality all affect how the finished space performs year-round.
Step 8: Finish the interior and exterior
Interior fit-out
Wall linings, flooring, kitchen, bathroom, and storage all follow the same logic as any other interior fit-out. Container homes reward compact, well-designed layouts. Built-in storage, smart furniture placement, and considered material choices make a big difference in smaller spaces.
Exterior finish
A finished container home does not have to look like a shipping container. Timber cladding, render systems, and painted steel all change the character of the building significantly. A well-designed exterior also provides an extra layer of weather protection for the steel structure underneath.
Step 9: Final checks before move-in
Inspect performance, not just appearance
Before moving in, check the things that determine whether the building actually works: weatherproofing at all joints and penetrations, insulation performance, door and window sealing, ventilation functioning correctly, and all utilities operating as designed.
If building regulations approval was required, sign-off happens here. Do not skip or rush this stage.
Comfort is the real test
A finished container home should be dry, well insulated, properly ventilated, and comfortable in all seasons. If it is cold in winter, damp in summer, or noisy in rain, something in the build process needs revisiting. The container itself is just the starting point.
Is it better to build a container home yourself or use a specialist?
When DIY can work
Smaller projects, confident builders with relevant trade experience, and flexible timelines can all support a self-managed approach. A garden annexe or compact single-container build is more manageable than a full multi-container family home.
When specialist help is worth it
For a permanent home, complex multi-container layouts, projects with tight planning requirements, or any build where the margin for error is low, specialist support pays for itself. The structural, insulation, and utility work in particular benefit from experienced hands.
If you would rather hand off the complexity entirely, exploring Universal Containers shipping container homes is a good way to see how a professionally delivered project comes together, from design through to delivery.
Bringing it all together
A container home is a real building project, not a shortcut to a cheap house. The sequence matters: define the project, check permissions, choose the right containers, prepare the site, modify safely, insulate thoroughly, install utilities well, and finish with care.
Done properly, the result is a durable, efficient, and genuinely livable home. Done in the wrong order or with corners cut on insulation and structure, it can be an expensive fix.
Take the build seriously from the first step, and the later steps get considerably easier.
FAQs
Do you need planning permission for a shipping container home?
Usually yes for permanent residential use. Requirements vary by site, local authority, and how the building will be used. Contact your local planning authority before starting any work.
What foundation do you need for a shipping container home?
The right type depends on site conditions and the scale of the build. Concrete piers suit simpler builds, strip footings work for longer spans, and a full slab is the most stable option for permanent homes. A structural engineer should advise based on your specific site.
Can you build a container home with used containers?
Yes, but condition matters more for a home than for storage. Inspect carefully for structural integrity, floor condition, and any contamination history. One-trip containers are generally the better starting point for a conversion.
How do you insulate a shipping container home?
Spray foam, rigid board, and framed internal wall systems are all used. The right choice depends on the build, the budget, and how much internal width you can afford to lose. The key is managing both thermal bridging and moisture, not just adding insulation thickness.
Are shipping container homes warm enough in winter?
Yes, if insulated and ventilated properly. An under-insulated or poorly ventilated container home will be cold, damp, and uncomfortable. One that has been built correctly will perform well in UK winters.
How long does it take to build a shipping container home?
A simple single-container conversion can take a few weeks of active build time. A more complex multi-container permanent home with full planning, groundworks, and fit-out is more likely to take several months from start to finish. Planning and groundworks usually take longer than the container work itself.