
Hoodie Anatomy 101: What a Hellstar Level Build Looks Like Up Close
Most People Have Never Really Looked at a Hoodie
You’ve probably owned twenty hoodies in your life, and I’d bet you’ve never truly examined a single one. That’s not an insult. Nobody teaches this stuff, so we all buy with our eyes, judge by the graphic, and wonder later why one hoodie lasted five years while its twin died in five months. The answer was sitting in the details the whole time. A hoodie is a small machine with about eight working parts, and each part either holds up or gives out on its own schedule. Brands like hellstar earn their reputation in exactly those parts, since heavyweight fleece, firm ribbing, and a structured hood are decisions someone made at a factory long before you saw the product photo. Cheap hoodies make the opposite decisions in the same places, and the price gap between the two is mostly the sum of those choices. So this guide does something a bit unusual. Instead of talking about style, it walks the garment itself, piece by piece, the way I do when I tear one down on my desk. The hood and its drawstrings. The shoulder seams that carry all the weight. The cuffs and hem that hold the shape. The pocket, the fabric, the print sitting on top of it all. By the end, you’ll read a hoodie the way a mechanic reads an engine, and you’ll spot a weak build from across the store. Fair warning, though. Once you learn to see this, you can’t switch it off, and half the hoodies at the mall will start looking like problems waiting for a buyer. Your wallet will thank you. Your old shopping habits won’t.
The Hood: Where Hellstar Style Structure Shows First
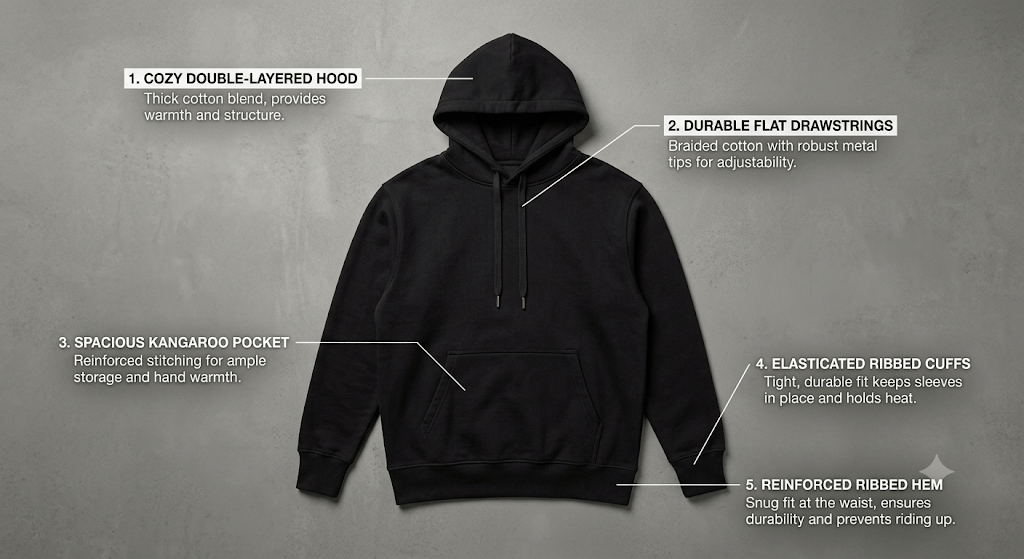
Start at the top, because the hood is the most honest part of the whole garment and the fastest place to judge a build. A quality hood is cut from either two or three panels, and that number matters more than it sounds. Three panel hoods include a center strip running front to back, which lets the hood curve around your head and stand with real shape, while basic two panel hoods form a flat pouch that collapses against your neck the moment there’s wind. Check the lining next. Good hoods are fully lined, often doubled in the same fleece as the body, which gives them the weight to sit up and frame your face, and it’s exactly the structured look you see across the range at hellstar, where the hood is treated as part of the design instead of an afterthought stapled to a collar. Now feel the edge where the hood meets the body. There should be a clean, reinforced seam there, because that junction takes stress every single time you pull the hood up or shrug the hoodie on. Then look at the eyelets, the little rings where drawstrings exit. Metal eyelets stay round for years, stitched eyelets do fine, and bare punched holes fray into sad ovals within a season. The drawstrings themselves tell a story too. Flat, thick cords in matching fabric signal care, while thin shiny shoelace material signals corner cutting, and cords that are sewn in at the back center never get lost in the wash, a small detail that separates thoughtful builds from lazy ones. Thirty seconds at the hood tells you most of what the next thirty minutes of inspection would confirm. Builders who care start caring at the top.
Seams and Stitching: The Skeleton Holding Everything Up
Seams are the skeleton of a hoodie, and once you learn the three second inspection, you’ll never skip it again. Flip the garment inside out and work through this sequence:
- Shoulder seams first. They carry the entire weight of the garment plus whatever your backpack does to them, so look for taped or double stitched lines with no puckering.
- Armpit junctions second. Four fabric panels meet in one spot there, which makes it the most common first failure point on any cheap build.
- Side seams third. Run a finger down each one checking for straightness, since wavy side seams predict the dreaded seam twist after washing.
- Hem and cuff attachments last. The ribbing should join the body in a clean, even line with no loose threads waving at you.
Stitch density matters across all four stops, and you can estimate it by eye, because tight, close stitches hold under stress while long, lazy stitches let fabric shift and gaps open. Flatlock seams, the flat wide stitching you see inside athletic gear, earn bonus points since they lie smooth against skin and resist abrasion. Meanwhile, a single loose thread isn’t a death sentence, but three or four in one area means the machine settings were wrong for the whole batch, so treat the piece accordingly. Here’s the part that surprised me when I started doing teardowns: stitching quality is remarkably consistent within a brand, so one well sewn product from a store almost always means the rest match it. Inspect one piece properly and you’ve effectively inspected the catalog. That’s leverage-free knowledge working for you, and it costs nothing but a minute of flipping fabric.
Fleece, Loops, and Weight: What the Fabric Is Actually Doing
Fabric gets described with pretty words, so let’s replace them with what your hands can verify. Inside a sweatshirt or hoodie, the material is either loopback or brushed, and you can tell instantly by touch. Loopback, also called French terry, shows tiny visible loops of thread on the inside, breathes well, and suits lighter pieces meant for mild weather. Brushed fleece is that same construction run through a machine that raises and softens the loops into fuzz, and the fuzz is functional, because raised fibers trap air and trapped air is what warmth actually is. Weight is the second axis, measured in GSM, meaning grams per square meter. Around 280 sits at the light end, 300 to 380 covers solid everyday territory, and 400 upward is where fabric stops draping like cloth and starts holding shape like structure. Heavy fabric also protects the parts around it, since a dense body pulls less at its own seams when wet and supports prints so they flex less at the fold lines. Cotton content matters alongside weight. Pure cotton feels best and breathes best, while an 80/20 cotton polyester blend trades a little softness for shape retention and quicker drying, a fair deal for a daily piece. Now the hands on detail that took me a hundred teardowns to trust fully: pinch the fabric at the forearm, not the body. Brands sometimes put their heaviest material in the torso panels where shoppers pinch, and save thinner cloth for the sleeves where nobody checks, so the forearm is where the honest answer lives. A build that’s heavy everywhere is a build made in good faith. Sleeves tell on the ones that aren’t.
Cuffs, Hem, and Collar: The Endpoints That Decide the Silhouette
Ribbing is the elastic knit at the wrists, waist, and neckline, and these three endpoints quietly control whether a hoodie looks intentional or exhausted. Their job is mechanical. The cuffs and hem gather the loose fabric of the body, creating that slight controlled ballooning that makes relaxed fits read as designed instead of borrowed, and the collar frames your face while surviving being stretched over your head a few hundred times a year. Quality ribbing contains spandex or tight knit structure that recovers instantly, so run the test every time you shop:
- Stretch a cuff wide and release it, counting how fast it snaps back, because instant recovery means years of shape and slow recovery means bagging by month two
- Look at the ribbing width, since deep cuffs of two inches or more hold better and stack cleaner than skinny half inch trim
- Check that the collar has a reinforcing tape or second seam inside, which stops the neckline stretching into an oval
- Compare the ribbing color to the body after imagining thirty washes, as cheap ribbing fades on a different schedule and turns two toned
- Feel for doubled fabric in the hem band, because single layer hems fold and curl upward while doubled ones hang straight
Those endpoints also explain a laundry rule you’ve heard without the reason attached. Dryer heat destroys elastic recovery permanently, so the machine that shrinks your hoodie is the same one that kills its cuffs, and no repair brings ribbing back once it’s gone. My personal bias, stated plainly: I’ll take average fabric with excellent ribbing over excellent fabric with weak ribbing, because the silhouette lives and dies at the endpoints, and silhouette is what people actually see.
Pockets, Zippers, and the Hardware Nobody Inspects
The kangaroo pocket looks like the simplest part of a hoodie, and it’s where lazy manufacturing hides most comfortably, so give it its own minute. A proper pouch is a separate panel stitched onto the body with reinforcing bar tacks at all four corners, those little dense stitch blocks that stop the pocket tearing open when hands go in rough or a phone rides there all day. Cheap builds skip the bar tacks, and the pocket corners lift within months, starting as a tiny flap and ending as a hole. Check the pocket opening edges too, since folded and stitched openings survive while raw serged edges stretch and curl outward. Depth matters practically, because a shallow pouch drops your phone when you sit, and you can test it in store by simply putting your hand in past the wrist. Zip hoodies bring hardware into the picture, and hardware quality is refreshingly easy to judge. Run the zipper up and down three times, listening and feeling for smoothness, because a zipper that catches when new only gets worse, and a bent or plastic feeling pull tab predicts the first repair bill. Metal zippers with fabric backing tape sewn straight are the standard worth holding out for. This attention to small parts is also where you feel the difference between garment categories, since a clean crewneck skips pockets and zippers entirely, which is partly why something like a parke sweatshirt can pour its whole build budget into fleece weight, ribbing, and seams instead of hardware. Fewer parts, fewer failure points, and that’s a real argument for crewnecks as the most durable shape in the whole category. Pockets are convenient. Simplicity is reliable. Know which one you’re buying and inspect accordingly.
Prints, Embroidery, and What Sits on the Surface
Everything so far was the machine, and now comes the paint job, which is where most buying decisions actually get made, so learn the three surface methods and their futures. Screen printing pushes ink into the fabric in layers, and done well it becomes part of the garment, soft to the touch, flexible at the folds, and capable of fading gracefully into that lived in look people pay extra to fake. Heat transfers glue a printed film onto the surface instead, and they photograph identically to screen prints on day one, which is exactly the trap, because transfers crack along the chest fold line where fabric bends every time you sit, and once cracking starts it spreads like a windshield chip. Tell them apart by touch, since transfers feel plasticky with a detectable edge where the film ends, while screen prints feel like slightly stiffer fabric. Puff prints, the raised rubbery style, sit between the two, durable on heavy stable fabric and doomed on thin fleece that stretches beneath them, which is one more reason fabric weight decides print lifespan. Embroidery plays a different game entirely. Thread stitched through the fabric survives basically forever, never cracks, and reads as understated quality, though it suits small logos and text rather than big chest art, and dense embroidery on thin fabric puckers the area around it, so check that the fabric lies flat around any stitched design. Placement finishes the picture. High chest prints stay visible under open jackets, stomach level graphics vanish the moment you layer, and back prints need the fabric weight to hang flat or the design warps with every step. The surface is what you fell for. The machine underneath decides how long you keep it.
Reading a Product Page Like a Teardown
You won’t have the garment in hand when shopping online, so here’s how the whole anatomy lesson translates to a screen. Photos come first, and you now know what to hunt for in them. Zoom the hood looking for panel seams and lining, find at least one shot showing the inside fabric so you can spot loops or brushing, and check whether any image shows the cuff ribbing close enough to count the ribs, because stores photograph their strengths and quietly crop their weaknesses. The description gets the same treatment. A GSM number or exact cotton percentage outranks a paragraph of soft adjectives, mentions of specific construction like double stitching, bar tacks, taped collars, or metal eyelets are claims someone can be held to, and total silence about fabric weight on a premium priced piece should make you pause. Size charts reveal build philosophy too, since brands publishing real garment measurements in inches respect your time, while charts offering only letters against height ranges are guessing on your behalf. Reviews fill the gaps that marketing leaves, especially any mention of wash behavior, shrinkage, pilling, or how the piece feels after a month, because customers report the timeline that product pages end at checkout. Now the honest limitation, because this guide owes you one. No inspection, in person or online, fully predicts how a garment lives on your specific body through your specific routine, and even excellent builds occasionally ship with a bad unit from a good batch. The anatomy knowledge shifts the odds heavily in your favor. It doesn’t make you psychic, and anyone promising certainty in clothing is selling confidence, not cotton. Stack the odds, inspect on arrival, and keep receipts until the piece earns your trust.
Final Words
A hoodie is eight parts pretending to be one, and now you can see all of them. The hood shows the builder’s intent, the seams carry the load, the fabric weight sets the drape and the warmth, the ribbing holds the silhouette, the pocket corners and zippers reveal the corner cutting, and the print method decides how the surface ages. Run the checks in store or through a screen, trust the forearm pinch and the cuff snap over any marketing sentence, and inspect every new arrival while returns are still open. Do that and the hoodies you own will be the hoodies you chose, part by part, on purpose.
8. FAQ BLOCK
Q: What makes a hoodie high quality?
A: Heavy fabric around 350 GSM or more, a lined multi panel hood, taped or double stitched shoulder seams, deep ribbed cuffs that snap back instantly, bar tacked pocket corners, and a screen printed or embroidered design rather than a heat transfer.
Q: How can I tell a screen print from a heat transfer?
A: Touch the design edge. Screen prints feel like slightly stiffer fabric with no ridge, while transfers feel plasticky with a detectable film edge. Transfers also crack along the chest fold line with wear, which is where to look on any used piece.
Q: Why do hoodie cuffs and collars get loose over time?
A: Dryer heat breaks down the elastic recovery in ribbing, and stretching does the rest. Once ribbing loses its snap, it never comes back, so wash cold and air dry. Deep cuffs with tight knit or spandex content survive years longer than skinny trim.
Q: Are crewneck sweatshirts more durable than hoodies?
A: Often yes, simply because they have fewer parts. No hood seam, no drawstrings, no eyelets, and usually no pocket means fewer failure points, so the build budget concentrates on fleece weight, ribbing, and seams instead of hardware.
Q: What should I check first when a hoodie arrives from an online order?
A: Pinch the forearm fabric for honest weight, stretch a cuff and watch the recovery, flip it inside out to scan the armpit and shoulder seams, then run a thumbnail along the print edge. Ten minutes of checks while the return window is fully open.