P0117 & P0118 Fault Codes: A Guide to Coolant Sensor Issues
A check engine light on your excavator or tractor’s dash can grind a job to a halt. When your scanner spits out P0117 or P0118, it’s pointing straight at the engine coolant temperature (ECT) circuit. But here’s the kicker: these codes are about an electrical glitch, not an overheating engine. This guide cuts through the jargon, tells you what these codes actually mean, what to watch for, and how to track down the problem on your diesel machine.
What Do P0117 and P0118 Mean?
Both codes are generic OBD-II trouble codes that mean the Engine Control Module (ECM) is getting a wonky signal from the coolant temperature sensor. The ECM leans on that signal to tweak fuel mix, injection timing, and radiator fan operation. When the voltage goes out of whack, the ECM throws a code.
P0117: Engine Coolant Temperature Circuit Low Input
P0117 means the ECM sees abnormally low voltage from the sensor. In most setups, low voltage gets read by the ECM as sky-high temperature—so your dash gauge might peg at max even when the engine’s stone cold. The usual suspect? A short somewhere in the wiring.
P0118: Engine Coolant Temperature Circuit High Input
P0118 is the flip side—the ECM is seeing voltage that’s too high, which it interprets as a temperature well below freezing. Your gauge might not budge at all, or the engine could get hard to start and blow black smoke because the ECM is over-fueling, thinking it’s freezing outside.
What Are the 4 Common Symptoms of a Bad Coolant Sensor?
A flaky coolant sensor doesn’t just trip a code—it messes with performance. Keep an eye out for these:
- Inaccurate Temperature Gauge: Pegged high, stuck low, or bouncing around.
- Increased Fuel Consumption: The ECM dumps in extra fuel like it’s warming up the engine, and you pay for it at the pump.
- Black Smoke from Exhaust: That wrong fuel mix leads to sloppy combustion.
- Hard Starting: The engine fights you, whether it’s cold or already warmed up.
How to Diagnose P0117 and P0118 Faults in 3 Steps
Don’t just throw parts at it. Follow this logical game plan to nail the real culprit.
Step 1: Inspect the Wiring and Connector
Start with the easiest and most common fix—a good eyeball check. Look closely at the sensor plug for green crusty corrosion, a loose fit, or frayed/melted/broken wires. A chewed-up harness is a frequent offender for both codes.
Step 2: Test the Sensor with a Multimeter
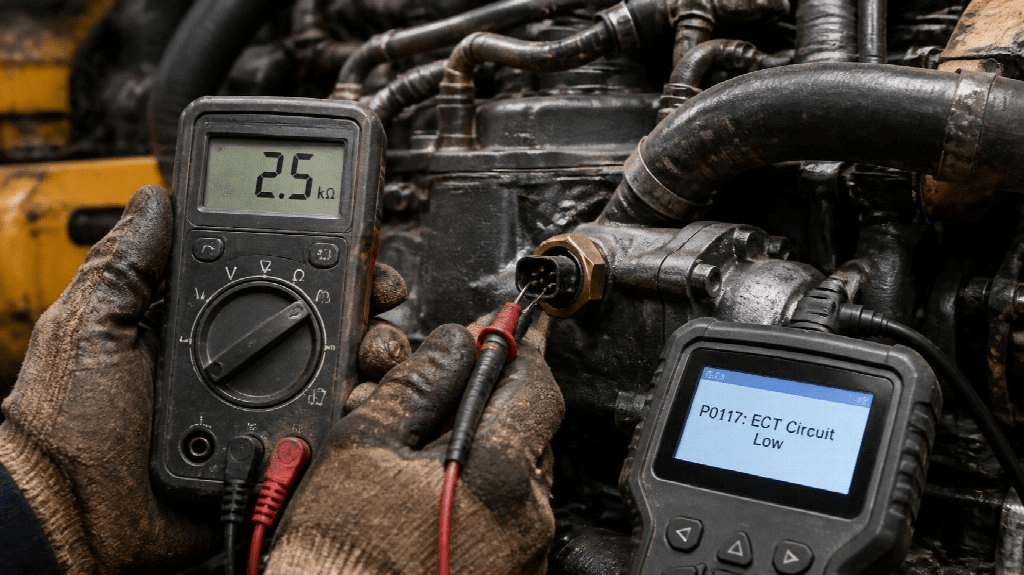
If the wiring checks out, test the sensor itself. Unplug it and set your multimeter to resistance (Ohms). A healthy sensor shows a specific resistance when cold, and that number drops smoothly as it warms up. If you get infinite resistance (open) or zero (short), the sensor’s toast.
Step 3: Verify Voltage at the Connector
This tells you whether it’s the sensor or the circuit. With the key on and the sensor unplugged, check voltage at the connector. You should see one pin with a 5-volt reference from the ECM and another for ground. No 5 volts or no ground? Then you’re chasing a wiring issue or an ECM problem.
The Final Verdict
Follow these steps, and you’ll pinpoint the cause with confidence. If the wiring looks clean, you’ve got 5 volts at the plug, but the sensor fails the resistance test—swap the sensor. If the sensor tests fine but there’s no voltage at the connector, you’ve got a circuit problem. Remember: P0117 usually means a signal wire shorted to ground; P0118 points to an open circuit or a bad ground. This methodical approach ensures you only replace what’s actually broken.